Extracting Reports from a Legacy EMR
Most healthcare systems that have been around for a while have gone through an upgrade, either to a new edition of their existing EMR (Electronic Medical Record) software or to an entirely different EMR. All the data stored in the old EMR - patient records, billing data, often images or scanned documents - must be kept, of course. This either means converting it into the new system or keeping the old system as a legacy read-only reference.
However, licensing expenses for old software can quickly pile up. The company providing the EMR software might stop supporting it. Sooner or later, that data needs to be extracted to a new system for reference purposes.
We recently decided to eliminate four such legacy applications. Some had been partly converted in the past, but there were still remaining documents and records that needed to be extracted and, ideally, collected into one place for ease of reference. We already had a document storage solution that would work; it was just a matter of extracting the data we needed, in document format, from those old systems.
We started by contracting with a company that handles these sorts of extractions. The process was simple enough: we’d load images of the old EMR servers onto encrypted hard drives and ship them out; then, they’d pore over the data, reconstruct the document formats, and ship back clean documents ready to import into our document storage application.
Unfortunately, one of those four legacy applications was not quite as easy to work with. It was built in the 70s around an entirely custom operating system and file system. The extraction company wasn’t familiar with this format, and as a result, we had to take a different tack.
Python Automation
My go-to solution when a lot of manual work is to be done: Write a script to do that work for me. There are third-party scripting engines with a lot of power, but my preference is Python for two reasons: I am more comfortable (and faster) with code than with a click-and-drag scripting engine; and it is much easier to handle complex integrations (more on this later).
I have built a desktop automation library for just such purposes; however, in this case, I noticed that the EMR’s client was just a dumb terminal, connecting via telnet to the application server. So I tried launching telnet and connecting directly - and it worked! Sort of:
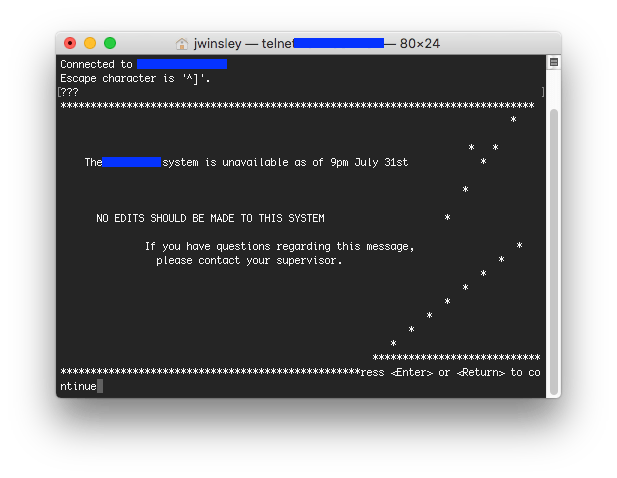
Clearly, there were some formatting details missing. I wrote a script to connect using telnetlib3 (I wasn’t able to get the stock Python telnet library to successfully negotiate a connection) and dumped the returned bytes for analysis.
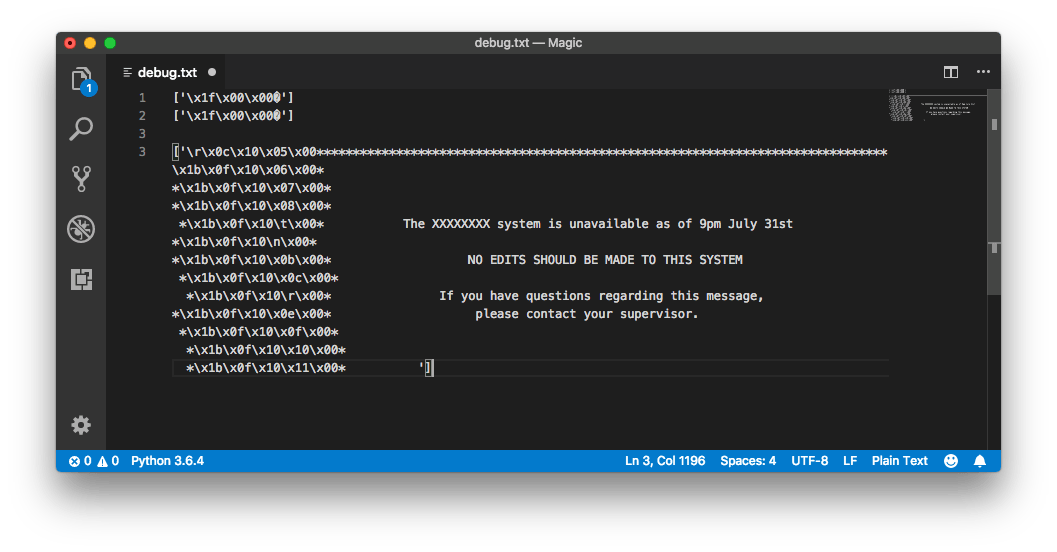
It’s immediately clear that those \xNN bytes are invisible ASCII control characters. \x1b is the ASCII escape character, for example, and \x10 is the code for a Data Link Escape character. But these bytes seemed to have a different purpose; after experimenting for a bit and working through more application output, I figured some of it out.
The \x1b character is the start of a control sequence, which (in most cases) only has one more byte. I discovered later that if the second byte is a | character, then everything up to the next \x19 character is also part of the control sequence - but initially, the only example I had was \x1b\x0f , which I determined could be discarded for the purposes of this automation script.
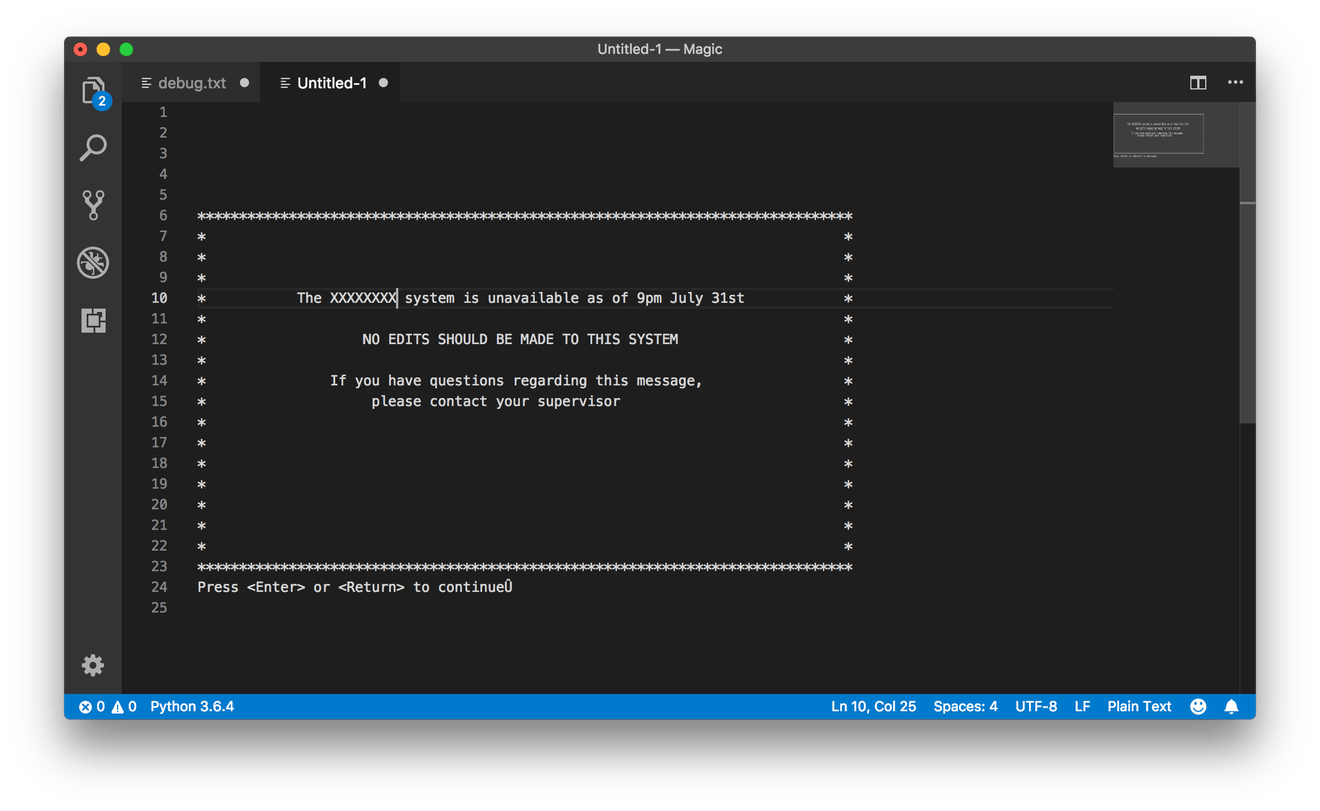
The \x10 character, on the other hand, was more relevant: I saw a pattern of \x10 followed by two more bytes with relatively small values (from 0 to 25, or 0 to 100, in decimal). These looked like screen coordinates, so I tested it: I made an object in Python to represent a “screen” of 80x25 characters, and used the values in the \x10 control sequence to set the cursor position before writing the following text. Sure enough, this resulted in a legible screen “image”:
From there, it was a matter of trial and error, working through the other invisible control codes to decipher what they meant (or if they could be ignored). I just needed to reconstruct the text on the screen, for scripting and/or scraping purposes, so anything relating to layout or the writing of text was relevant; color codes, for example, I didn’t have to worry about. There were also codes to describe windows and layers, each of which was effectively a separate page to be drawn on.
In order to represent this in Python, I just set up a loop through the telnet data stream, modifying the screen object directly (or creating new ones) based on those control codes. Here’s a sample:
@asyncio.coroutine
def shell(self, reader, writer):
    screens = [Screen()]
    remainder = ""
    while True:
        outp = yield from reader.read(1024)
        outp = remainder + outp
        remainder = ""
        if not outp:
            # EOF
            return

        outp = list(outp) # Convert the string into a list of characters
        while len(outp):
            char = outp.pop(0)
            # Check for escape sequences
            if char == "\x00": # Null
                # Ignore this character
                continue
            if char == "\x10": # Move cursor to [row][col]
                if len(outp) < 2:
                    remainder = "\x10" + "".join(outp)
                    break
                row = outp.pop(0)
                col = outp.pop(0)
                screens[-1].move_cursor(ord(row), ord(col))
                continue
            if char == "\x1b": # Ignore this escape sequence
                flags = [outp.pop(0)]
                if flags[0] == "|":
                    while flags[-1] != 0x19:
                        flags.append(ord(outp.pop(0)))
                continue
            # Other cases...
            # Default case
            screens[-1].write(char) # Debugging
        if screens[-1].dirty:
            self.callback(screens[-1].render(), writer) # Screen updated
        time.sleep(0.1)
Now that I was able to read and write to the telnet session in a legible fashion, I needed an effective way to script different actions based on the screen state.
State Machines
Scripting an application is typically best described in terms of responses to the application’s state. When the application is displaying the login screen, you enter the login credentials; when it is displaying the menu, you select the options you want; and so forth. This can be described with simple procedural logic, but as the script gets more complex, a state machine is often more concise and easier to debug.
I went through a couple iterations before settling on a design pattern that looks like this:
class States(object):
    # Setup
    def __init__(self):
        self.set_state("segment") # Initial starting state
        self.timeout = 5 # seconds
    def set_state(self, new_state):
        self.current_state = new_state
        self.last_entered_state = time.time()
    async def check_timeout(self):
        await asyncio.sleep(self.timeout)
        if time.time() - self.last_entered_state > self.timeout:
            raise TimeoutError(f"Timed out waiting for state {self.current_state}")
        # print("Not timing out") # DEBUG
    def run(self, screen, writer):
        getattr(self, self.current_state)(screen, writer)
        self._task = asyncio.ensure_future(self.check_timeout())
    def done(self):
        print("Reached end of states. Terminating.")
        sys.exit()

    # States
    def segment(self, screen, writer):
        # Test against the application state
        if "Segment" in screen:
            writer.write("A\r")
            writer.write("LIVE.MIS\r")
            writer.write("MIS.signon\r")
            self.set_state("splash")
    def splash(self, screen, writer):
        if "Press <Enter> or <Return> to continue" in screen:
            writer.write("\r")
            self.set_state("hcis")
    def hcis(self, screen, writer):
        if "1. GENERAL HOSPITAL *LIVE* MIS" in screen:
            writer.write("1\r")
            self.set_state("login")
    def login(self, screen, writer):
        if "User ID" in screen:
            writer.write("USERNAME\r")
            writer.write("PASSWORD\r")
            self.done()
This creates a States object, with a couple tricks to minimize the amount of code that I write.
Each state is represented by a method on the object. The method is passed the current screen state and a writer object to send data back up the telnet stream. Then, the state checks if its condition is met; if so, it responds using the writer object, and then changes the current state.
Originally, I had a mapping dictionary of valid states to each of the functions. With the getattr() call, the run() method just needs to know the name of the current state function, and it can call it directly. This makes the code much more concise (which, in turn, makes it more fun to write).
I ran into a thorny issue while working on the script: If the program met with an unexpected screen state, it would hang forever, as the current state would never match and therefore never finish. To solve this problem, I added an asynchronous timeout call. Every time the state changes, a timestamp is updated, and the timer kicks off; it checks back after 5 seconds, and if the timestamp hasn’t been updated since then, it assumes there was a problem and raises an error.
You might think you could get away with just checking that inside the run() method call, but if you look back up at the screen generator, you’ll see the callback is only triggered when the screen is actually updated - so if the screen hangs, it would never re-run. The asynchronous watchdog gets around this limitation.
A Print Server
Now that I had a working telnet driver and scripting engine, I was close to having everything I needed - but for one thing. I had to extract those reports from the system somehow, and there was no way to download them over the telnet interface. I could, however, set up a printer - so I did some digging to find a virtual printer driver that I could use.
The application only supported two kinds of network printers: LPD (Line Printer Daemon) protocol or raw socket protocol. I found a couple virtual SMB printers (the kind you’d usually print from on Windows), but nothing for LPD beyond an abandoned PHP script. So, once again, I turned back to Python.
Python (like most programming languages) has some socket support built-in, and with some tinkering, it turned out to be pretty easy to set up a raw socket server using the socketserver module:
import socketserver
import tempfile
import os
import subprocess

GHOSTPCL = "/path/to/ghostpcl"
OUTPUTFOLDER = "/outputfolder"

class RawSocketPrintHandler(socketserver.StreamRequestHandler):
    """
    Request handler for raw-socket printing.
    """
    def handle(self):
        self.data = self.rfile.read()
        print("{} sent a print job".format(self.client_address[0]))
        # Dump PCL data to file
        fp, filename = tempfile.mkstemp(suffix=".pcl")
        fp = os.fdopen(fp, mode="wb")
        fp.write(self.data)
        fp.close()
        # Convert PCL to PDF
        pdf_name = ""
        with tempfile.NamedTemporaryFile(suffix=".pdf", dir=OUTPUTFOLDER) as outpdf:
            pdf_name = outpdf.name
        subprocess.Popen([GHOSTPCL, "-dNOPAUSE", "-sDEVICE=pdfwrite", f"-sOutputFile={pdf_name}", filename])
        print(f"Dumped to {pdf_name}")


if __name__ == "__main__":
    HOST, PORT = "0.0.0.0", 9100

    with socketserver.TCPServer((HOST, PORT), RawSocketPrintHandler) as server:
        print(f"Print server listening on {HOST}:{PORT}")
        server.serve_forever()
When a print job is received, the handle() method writes it to a temporary PCL file, and then uses GhostPCL to convert it into a PDF.
That’s the easy part: the hard part is that this is completely separate from the main automation script, so it doesn’t know what the automation script is trying to print and can’t let it know that the document is ready. Instead, it just saves it with a temporary filename, and lets the automation script do the rest.
Back in the state machine, we have a step to wait for this file to be generated, our longest one yet. Because we aren’t waiting for a particular screen state, this step just loops indefinitely until the file appears. Then, it attempts to move the file, and repeats in case of failure (if, for example, the print server hasn’t finished writing it yet).
def wait_for_printed_file(self, screen, writer):
    # Wait for the PDF to generate (this step will block until complete)
    while True:
        # Get list of PDF files from the print queue folder
        while True:
            time.sleep(0.5)
            try:
                files = [f for f in os.listdir(PRINT_FOLDER) if f.endswith(".pdf")]
            except PermissionError:
                print("Permission error listing files")
                time.sleep(0.3)
                continue
            break

        # Make sure there's only one file waiting to be processed, and handle it
        if len(files) > 1:
            raise IOError("Too many files in print queue, don't know which one belongs to patient")
        elif len(files) == 1:
            while True:
                try:
                    shutil.move(os.path.join(PRINT_FOLDER, files[0]), os.path.join(OUTPUT_FOLDER, patient_account + "_detail.pdf"))
                    time.sleep(0.5)
                    if not os.path.exists(os.path.join(OUTPUT_FOLDER, patient_account + "_detail.pdf")):
                        print("File move failed?")
                        continue
                except FileExistsError:
                    print("Removing " + os.path.join(OUTPUT_FOLDER, patient_account + "_detail.pdf"))
                    os.remove(os.path.join(OUTPUT_FOLDER, patient_account + "_detail.pdf"))
                    continue
                except (FileNotFoundError, PermissionError):
                    # Resource busy; wait until it's available
                    time.sleep(0.3)
                    continue

                # Log completed file
                with open(LOGFILE, "a") as log:
                    log.write(patient_account + "\n")
                print(f"Filed \"{patient_account}_detail.pdf\".")
                self.set_state("wait_for_finished_print")
                break
            break
        else:
            continue # No file yet
This is where I ran into perhaps the strangest issues. I was running the automation script on my Mac, moving the files around on one of the organization’s SMB shares. For a while it worked fine, but after copying a few thousand files, my Mac refused to sync with the SMB share. I could see files sitting in the print queue folder on Windows, but they weren’t showing up in Finder. So, I copied the script over to my Windows scripting VM and started it up there.
Again, it worked fine for a time, but then inexplicably failed to move one of the files from the print folder. The call to shutil.move() passed without an error, and os.path.exists() reported that the new file existed while the old one had disappeared. But by the time the loop came around again for the next file, there was no sign of the new file - just the temporary file, sitting in the print queue like it had never left.
This happened intermittently, and I tried a couple different tests without success to nail down the problem. Someone suggested that it might be some kind of write caching, so finally I imposed an artificial delay with time.sleep(0.5) to give the system time to catch up. This slowed things down a bit, of course, but it also worked. Sometimes, that’s all you can ask for.
Conclusion
The hard part done, it’s time to kick back with a cup of coffee and watch the script run. Rarely will it run perfectly, even after you think you have all the bugs worked out. But it’s satisfying to watch the document count tick down as you inch ever closer to completion.
There are undoubtedly things that could have been architected more efficiently. I think the print server could probably have been integrated into the main script, with a little better understanding of asyncio, eliminating some of the file system hassles. That could also potentially allow the script to be deployed across a couple different worker processes to increase the speed of the extraction.
But overall, it’s been a fun exercise, and a good practical demonstration of the power of knowing a scripting language - and using it to build tools for your work.
Let me know what you think of this article on twitter @jonwinsley or leave a comment below!